How To Use A Clamp Meter

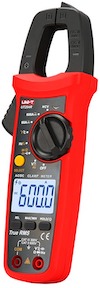
Figure 1: Clamp meter
A clamp meter measures current in a conductor without direct contact. This non-contact capability provides a safe method for measuring high currents that could otherwise be hazardous. In addition to current, a clamp meter can measure resistance and voltage, check continuity, and in some models, record frequency and temperature. This article explains the panel layout of a clamp meter and outlines the steps for taking accurate measurements.
Table of contents
View our online selection of clamp meters and multimeters!
How to use a clamp meter for measurements
Perform the following steps for accurate measurement using a clamp meter:
Have a proper understanding of application requirements
Be clear about the specific parameters of the experiment, such as resolution and accuracy. Using a clamp meter with 0.3A resolution may not detect changes of 0.1A during measurement. The level of accuracy required for the measurement should also be taken into consideration. Even though clamp meters are reliable, the readings are not as accurate as those produced by digital multimeters. The accuracy of the device used will normally be expressed as a percentage in the manual.
Understand the panel description and functionalities of the clamp meter
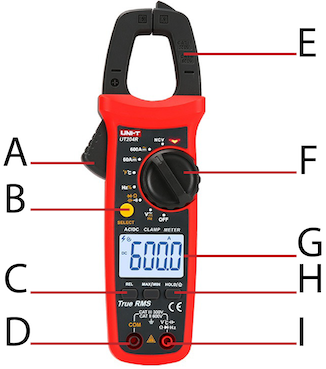
Each clamp meter has its distinct symbols on the panel. It is advisable to go through the manual and understand the functionality of each symbol on the display. Figure 2 shows the panel description of a clamp meter.
- Transformer trigger (A): To open the jaws.
- Select button (B):To select measurement modes such as current, voltage and resistance.
- Relative button (C): To nullify the current reading, and to use a zero-reference value for all subsequent measurements.
- COM terminal (D): Common reference input (GROUND).
- Transformer jaw (E): To pick up a current signal.
- Function selection (F): To choose the parameter to be measured (like alternating current (AC), direct current (DC), AC and DC voltages, resistance and continuity).
- Liquid crystal display (G): To show the results of measurement, function symbols and their units, low battery symbols, and max/min value of signals.
- Data hold (H): To freeze the current reading on the LCD.
- VΩ Input terminal (I): Input for voltage, resistance, continuity, or frequency measurements.

Figure 2: Panel description of a clamp meter: Transformer trigger (A), select button (B), relative button (C), COM terminal (D), transformer jaw (E), function selection (F), display (G), data hold (H), and VΩ Input terminal (I)
Taking a reading
The display will show the reading. The hold button can be selected to hold that reading on the screen, allowing you to remove the device and still have the reading on the display for recording purposes.
Current measurement
Perform the following steps to measure current using a clamp meter:
- Use the rotary selector to set the clamp meter to measure current.
- Make sure that the range of measurement is correct. The meter can be seriously damaged if the selected range is considerably less than the value being measured, hence choosing a higher range on the meter is highly recommended.
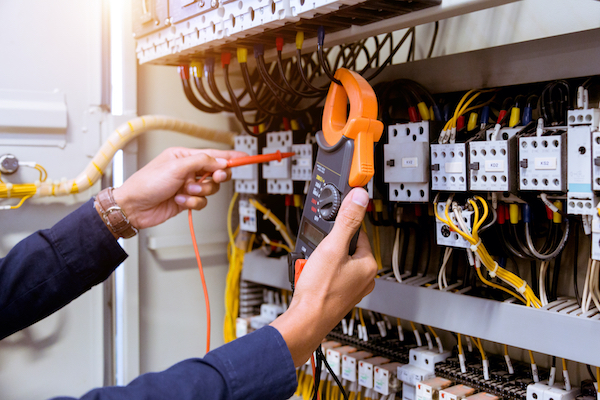
- Open the jaws of the clamp meter and put them around the wire whose current is to be measured.
- Note the reading on the display.

Figure 3: Measuring current using a clamp meter
Voltage and resistance measurement
Perform the following steps to measure voltage using a clamp meter:
- Use the rotary selector to set the clamp meter to AC/DC voltage or Ω function.
- Plug the test probes into the clamp meter. Connect the black probe to the COM jack and the red probe to the V Ω jack.
- Select the range for measurement.
- Touch the probe tips on the conductor and note the voltage/resistance reading.
Note: Switch off the power supply while using a clamp meter to measure the resistance of a circuit. Measuring resistance with the power on can damage the meter or the circuit.
Tips to maintain a digital clamp meter
- Store the tool properly. Corrosion in clamp meters can be prevented by placing them in a clean and dry environment.
- Clean the clamp meter properly after each use. The presence of dirt hampers the accuracy of measurement.
- Never place anything on top of the clamp meter, thereby making sure that the jaws of the meter are never off alignment (if the jaws are not aligned properly, the magnetic circuit will not close).


