How To Adjust an Air Compressor Pressure Regulator

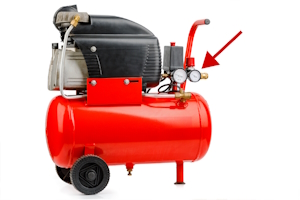
Figure 1: The red arrow points to the pressure regulator on the air compressor.
Pressure regulation is a critical aspect of operating air compressors effectively. Whether using an air compressor pressure regulator for industrial applications or simple DIY projects, maintaining the correct pressure settings is essential for ensuring the safety, efficiency, and longevity of pneumatic tools. Without proper regulation, tools can become over-pressurized or under-pressurized, leading to inefficiencies, potential damage, or even safety hazards. This guide will walk users through the air compressor pressure regulator adjustment process, ensuring that they can set the correct pressure for their tools every time.
Table of contents
- Setting the correct pressure for tools
- Adjusting the pressure regulator
- Common mistakes and how to avoid them
- FAQs
View our online selection of pneumatic pressure regulators!
Setting the correct pressure for tools
Setting the correct pressure for pneumatic tools is crucial for their optimal performance and longevity. Each tool has specific pressure requirements, which are typically outlined in the tool's manual or printed on the tool itself.
Common pressure ranges for various pneumatic tools
The following are some common pneumatic tools and their corresponding maximum operating pressures. Around 6 bar (87 psi) is the typical maximum operating pressure for many different tools. However, always check with a tool's manual before adjusting a pressure regulator.
- Air blow guns: 8 - 16 bar
- Car tire inflators: 10 - 25 bar
- Pneumatic jigsaws, impact drills, grinders, air hammers/chisels, belt sanders, rivet guns, wrenches: 6 bar
Be aware of a tool's pressure requirements
Any pneumatic tool has a minimum, optimal, and maximum pressure requirement. Ensure the regulator is not set below the minimum or above the maximum to avoid damaging the tool.
How to read pressure gauges
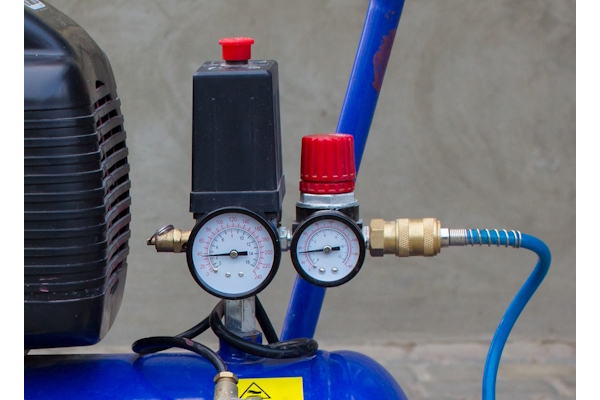
To accurately set the pressure, it is necessary to understand how to read the pressure gauges on an air compressor. Most compressors have two gauges: the air tank pressure gauge (Figure 2 left) and the outlet pressure gauge (Figure 2 right). The air tank pressure gauge is typically larger than the outlet pressure gauge and indicates the reserve pressure within the tank. The outlet pressure gauge shows the pressure being delivered to the tool. The pneumatic pressure regulator may have a built-in pressure gauge, allowing the regulator to additionally work as the outlet pressure gauge. By monitoring these gauges, users can ensure that the compressor is set to the correct pressure for their specific application.

Figure 2: Pressure gauges on an air compressor. Air tank pressure gauge (left) and outlet pressure gauge on pressure regulator (right).
Adjusting the pressure regulator
Pressure regulator adjustment on an air compressor is a straightforward process, but it requires attention to detail to ensure that tools receive the correct pressure. Follow this step-by-step guide to adjusting the pressure regulator.
- Power on the compressor: Begin by turning on the air compressor and allowing it to reach its operating pressure. This may take a few minutes as the tank fills with compressed air. Ensure that the compressor is in a stable and secure location to prevent any accidents.
- Connect the tool and air hose: Attach the pneumatic tool to the air hose, and then connect the hose to the compressor. Ensure that all connections are secure to prevent air leaks. If using a pneumatic tool for the first time, refer to the tool's manual to locate the correct port for the air hose connection.
- Unlocking and adjusting the regulator actuator: Locate the regulator actuator (e.g., knob or handwheel), which is typically situated near the outlet pressure gauge or connected to the pressure gauge if the latter is built into the regulator. Most regulator actuators have a locking feature to prevent accidental adjustments. To unlock the actuator, pull it outward. Once unlocked, turn the actuator to adjust the pressure.
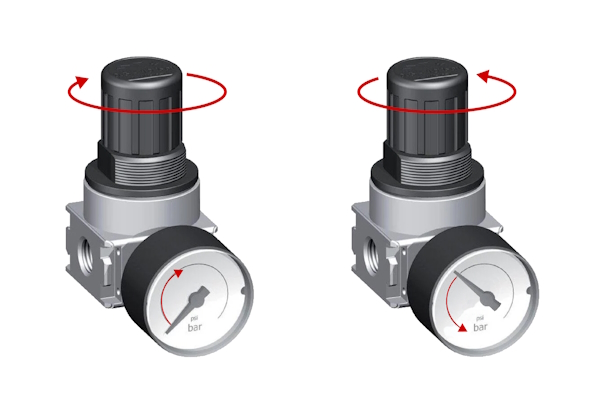
- Fine-tuning the pressure settings: To increase the pressure, turn the regulator actuator clockwise (Figure 3 left). To decrease the pressure, turn it counterclockwise (Figure 3 right). As the actuator is adjusted, keep an eye on the outlet pressure gauge to ensure that the pressure matches the requirements of the tool. Make adjustments slowly to avoid overshooting the desired pressure.
- Locking the regulator actuator: Once the desired pressure is set, push the regulator actuator back in to lock it in place. This prevents any unintentional changes to the pressure settings during operation.
- Testing the tool and making final adjustments: After setting the pressure, test the tool on a non-critical task to ensure it's operating correctly. If the tool seems underpowered or overpowered, make small adjustments to the regulator and test again.

Figure 3: Turn the knob clockwise to increase the pressure (left) and turn it counterclockwise to decrease the pressure (right)
Common mistakes and how to avoid them
When working with air compressors and pressure regulators, certain common mistakes can lead to inefficiencies, tool damage, or even safety hazards.
Over-pressurizing or under-pressurizing tools
One of the most frequent mistakes is setting the pressure too high or too low for the tools being used. Over-pressurizing can cause excessive wear and tear on tools, leading to premature failure or safety risks. Conversely, under-pressurizing can result in tools not performing as intended, causing delays and inefficiencies in work.
How to avoid
Always check the tool's manual for the recommended pressure settings before use. Adjust the pressure regulator carefully, monitoring the outlet pressure gauge to ensure it matches the tool's requirements. Test the tool on a non-critical task to confirm it operates correctly at the set pressure.
Ignoring manufacturer guidelines
Each tool and compressor comes with specific guidelines and recommendations from the manufacturer. Ignoring these can lead to improper use, voided warranties, and potential damage to equipment.
How to avoid
Be familiar with the user manuals for both the compressor and the tools being used. Follow the recommended maintenance schedules and operational guidelines provided by the manufacturers.
Failing to adjust settings for different tools
Using the same pressure settings for different tools without adjustment is a common oversight. Each tool has unique pressure requirements, and failing to adjust the regulator accordingly can lead to suboptimal performance.
How to avoid
Before switching tools, check the pressure requirements for the new tool and adjust the regulator as needed. Keep a log or checklist of the PSI settings for each tool commonly used, making it easier to adjust the regulator quickly and accurately.
FAQs
How do you adjust an air compressor pressure regulator?
To adjust an air compressor pressure regulator, turn the adjustment knob clockwise to increase pressure and counterclockwise to decrease it.
What is the purpose of an air compressor pressure regulator?
An air compressor pressure regulator controls the output pressure to ensure tools receive the correct pressure for optimal performance and safety.
Why is pressure regulation important for air compressors?
Pressure regulation is crucial to prevent over-pressurization or under-pressurization, ensuring tool efficiency, safety, and longevity.
Can improper pressure regulator adjustment damage tools?
Yes, improper adjustment can lead to inefficiencies, potential damage, or safety hazards due to incorrect pressure settings.


