Float Switch - Tether Point and Tether Length
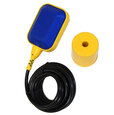
Figure 1: A tethered float switch for sump pump
The tether point and tether length are key elements of float switch systems, essential for ensuring accurate liquid level control. Correctly positioning the float switch relative to the water line is crucial for accurate switching with the rise and fall of the water level. Adjusting the float switch tether length and/or tether point controls the activation and deactivation levels, ensuring efficient operation of connected devices, whether they are pumps, valves, or other equipment. This article explains how these factors impact the functionality and reliability of float switches that are attached to pumps, but the same principles apply if they are connected to other devices, like valves. Additionally, we provide guidelines to ensure that float switches operate accurately and switch when they should.
Table of contents
- Understanding tethered float switches
- Tether point and tether length
- How to set float switch tether point and tether length
View our online selection of float switches!
Understanding tethered float switches
A tethered float switch includes a floating element attached to an electrical cord. This cord is secured to a fixed point, typically the pump or the piping associated with pump discharge. As the water level in the basin rises and falls, the float moves in an arc, activating the internal switch mechanism to turn the pump on or off. Read our float switch overview article for more details on the working and types of float switches.
Tether point and tether length

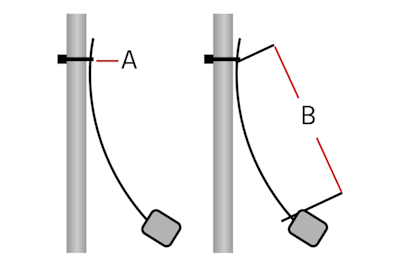
Figure 2: Tether point (A) and tether length (B) in a float switch
Tether point
The tether point (Figure 2 labeled A) is the location where the float switch is attached or anchored inside the tank. This point is crucial because it determines the pivot point around which the float will move as the liquid level changes.
Tether length
The tether length (Figure 2 labeled B) is the length of the cord or chain between the tether point and the float itself. This length determines how much the float can move up and down.
How to set float switch tether point and tether length
Properly setting the tether point and tether length ensures that the float switch activates at the appropriate water levels. This is crucial for sump pump applications, water tanks, and other liquid storage systems. The key concepts in all applications are the same, although the specific application might differ slightly based on the type of system being worked with.
- Disconnect the power source: To avoid the risk of electrocution, disconnect the pump from the power source before performing any work on the pump or float switch.
- Adjust the float switch tether point:
- Mounting bracket: Some systems may have a dedicated mounting bracket (for example, the MAC5 float switches come with an optional mounting bracket). This bracket is often attached to the sump pit wall or underside of the sump pit cover. Ensure the mounting bracket is securely fastened to prevent any movement that could affect the float switch's operation.
- Without mounting bracket: If there is no mounting bracket, the tether point can often be attached using a clamp or zip tie to a fixed structure within the tank (like a pipe or support beam).
- Positioning: Position the tether point on the mounting bracket (Figure 4) or clip at a height estimated to allow the float to rise to the desired activation level. To start the pump at a higher water level, move the tether point higher. To start it at a lower water level, move the tether point lower.
- Adjust the float switch tether length: To adjust the tether length on a float switch, increase the length if the pump needs to start or stop over a larger range of water levels, and decrease the length for a smaller range. This can be done by letting out more cord or shortening it between the tether point and the float. Test the adjustment by lifting and lowering the float manually to ensure the pump activates and deactivates at the desired water levels.

Figure 3: Pump start (A and A1) and stop positions (B and B1). Shorten the tether length to decrease the pumping range (left) and lengthen the tether length to increase the pumping range (right).
- Test with water: After adjusting the tether point and tether length, restore power to the system and test it by pouring several buckets of water into the sump basin. The pump should activate as the water level increases and continue operating until most of the water is removed, leaving just enough to cover the pump's inlet.
- Readjust the float switch as needed: If the float switch is not set at the desired on/off levels, disconnect the pump from the power supply and readjust the float switch. You may need to make several adjustments to achieve the ideal on/off levels for the sump basin/tank.

Figure 4: Mounting bracket for attaching four MAC5 float switches
Example
Consider a sump pump that needs to start pumping water when the water level reaches 10 inches and stop when it drops to 4 inches. Before starting the process, use a marker or tape to mark the desired water levels (10 inches for activation and 4 inches for deactivation) inside the sump basin. This visual aid can help quickly identify when adjustments are needed.
- Initial attachment: Attach the float switch to the mounting bracket or clip. Position the tether point on the mounting bracket or clip at a height estimated to allow the float to rise to the desired activation level (10 inches in this example).
- Initial testing: Fill the sump basin with water and observe when the pump activates. Note the water level at which the pump starts and stops.
-
Adjust based on observations:
- If the pump activates too early (e.g., at 8 inches): Move the tether point higher on the mounting bracket. This adjustment will allow the float to rise higher before activating the pump.
- If the pump activates too late (e.g., at 12 inches): Move the tether point lower on the mounting bracket. This adjustment will cause the float to activate the pump at a lower water level.
- Adjust tether length: If the tether length is too short, it may cause the pump to start too early or too late. Lengthen the tether to allow for a greater range of motion for the float switch. If the tether length is too long, the float might not activate the pump at the desired water level. Shorten the tether to reduce the range of motion.
- Re-test: After making adjustments, fill the sump basin again and observe the float switch's behavior. Ensure the pump starts at the desired activation point (10 inches) and stops at the desired deactivation point (4 inches).
- Document changes: Keep a record of each adjustment and its effect on the activation and deactivation points. This documentation can help understand the relationship between tether adjustments and water levels.
- Fine-tune: Continue to make small adjustments to the tether point and tether length as needed, with each adjustment bringing closer to the precise activation and deactivation levels.
Note: Make small, incremental adjustments to the tether point and length. Large changes can overshoot the desired levels and make fine-tuning more difficult.
Water level set points
For optimal performance, set the pump to start at a safe water level that prevents flooding and ensures efficient operation. Ensure the pump's intake is always submerged to avoid sucking in air, which can cause the pump to malfunction. Additionally, consider adding a small hole in the discharge line to prevent air lock if the basin runs dry.


