


How To Tighten Compression Fittings
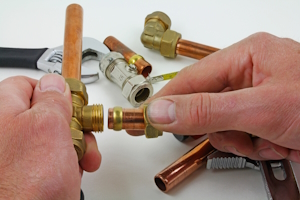
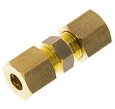
Figure 1: A compression fitting includes a ferrule and nut to provide a leak-free connection.
Tightening compression fittings requires careful preparation and attention to detail to ensure a leak-free connection. Before beginning the installation process, gather the necessary tools to ensure the pipe is adequately prepared and the fitting correctly aligned. Follow this step-by-step guide and avoid common mistakes for a secure and reliable installation.
View our online selection of compression fittings and related tools!
Necessary tools and materials
Before starting the installation, gather the necessary tools and materials to ensure a smooth process:
- Wrenches: Adjustable or open-end wrenches are required to tighten the compression nut. If possible, use an open-end wrench because it's less prone to slipping.
- Pipe cutter: A pipe cutter is essential for cutting the pipe to the desired length. Ensure the cut is clean and square to ensure a proper seal.
- Deburring tool: Use a deburring tool to remove any burrs or sharp edges from the cut pipe. This prevents damage to the ferrule and ensures a proper seal.
- Measuring tape: Accurate measurements ensure the pipe is cut to the correct length and the fitting is properly aligned.
Note: Do not prepare pipe sealant (aka pipe dope). It is not suitable for compression fittings.
Step-by-step guide to tighten compression fittings
This guide focuses specifically on tightening the compression fitting. For more information about these types of fittings, read our compression fitting overview and our guide to using compression fittings with copper pipes.
1. Ensure correct alignment
Correct alignment is crucial for achieving a leak-free connection with compression fittings. Misalignment can lead to uneven compression of the ferrule, resulting in leaks. Follow these steps to ensure proper alignment:
- Inspect the tubing: Ensure the piping or tubing is cut squarely and free from burrs. Use a tube cutter for a clean cut.
- Insert the tubing: As seen in Figure 2, slide the nut and ferrule onto the piping. Ensure the ferrule is oriented correctly, with the tapered end facing the fitting body.
- Align the tubing: Insert the piping into the fitting body until it bottoms out. Ensure the piping is straight and not at an angle.

Figure 2: Slide the nut (C) and ferrule (B) over the pipe end (A).
2. Initial hand tightening
Hand-tightening is the first step in securing the compression fitting. It sets the stage for the ferrule to engage properly with the piping.
- Thread the nut: Begin threading the nut onto the fitting body by hand (Figure 3). Ensure it turns smoothly without cross-threading.
- Tighten until snug: Continue hand-tightening until the nut is snug against the fitting body (Figure 4). This ensures the ferrule is in contact with the tubing.
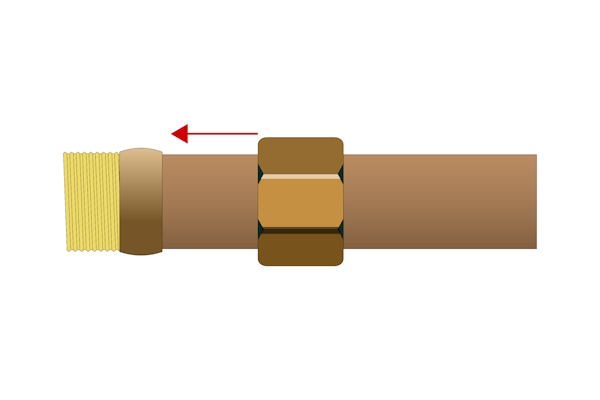
Figure 3: Position the ferrule against the threading and slide the nut over the ferrule.
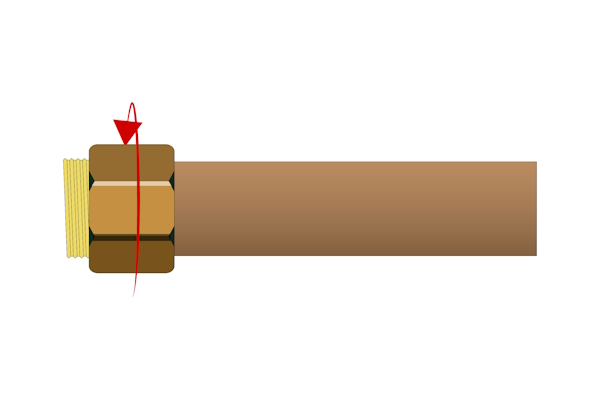
Figure 4: Tighten the nut onto the threads of the fitting until snug.
3. Use a wrench for additional tightening
After hand-tightening, use a wrench to apply the necessary torque to compress the ferrule onto the tubing.
- Select the right wrench: Use an open-end wrench that fits the nut size. Adjustable wrenches are not preferred because they can slip.
- Apply torque: Hold the fitting body with one wrench and use another to tighten the nut. This prevents the fitting body from rotating.
- Tighten to specification: Typically, tighten the nut 1/4 to 1/2 turn beyond hand-tight. Refer to the manufacturer's specifications for exact values.
Avoid common mistakes
Signs of overtightening and consequences
Overtightening compression fittings can damage the ferrule and piping, leading to leaks. Recognize these signs of overtightening:
- Deformed ferrule: A ferrule that is visibly distorted or crushed.
- Cracked tubing: Tubing that shows signs of stress or cracking near the fitting.
- Difficulty in loosening: Excessive force is required to loosen the nut.
Consequences of overtightening include:
- Leakage: Damaged components may not seal properly.
- Component failure: Cracked tubing or fittings can lead to system failure.
Adjusting after installation
If a compression fitting leaks after installation, adjustments are necessary:
- Loosen and re-tighten: Loosen the nut slightly and re-tighten to the recommended number of turns.
- Inspect components: Check for damaged ferrules or tubing and replace if necessary.
FAQs
How tight do you need to tighten a compression fitting?
Tighten a compression fitting 1/4 to 1/2 turn beyond hand-tight, depending on the fitting size.
How to install a compression fitting properly?
Ensure correct alignment, hand-tighten the nut, and use two wrenches to apply the recommended number of turns while securely holding the fitting body.
Can you over tighten a compression fitting?
Yes, overtightening can damage the ferrule and tubing, leading to leaks and component failure.

