Connecting a Controller to a Proportional Solenoid Valve
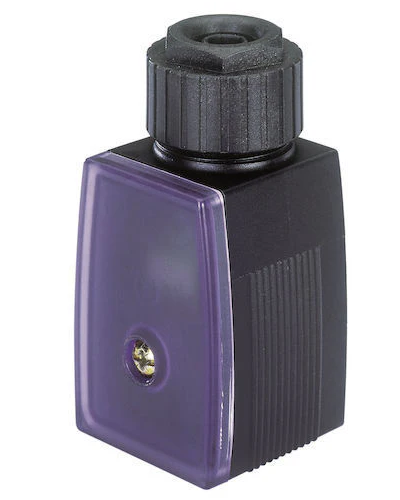
Figure 1: Burkert 8605 controller without operating unit
Proportional control of a solenoid valve provides precise fluid flow regulation, adjusting the valve plunger's position via advanced control algorithms and pulse width modulation (PWM). Proportional solenoid valves differ from standard solenoid valves by allowing intermediate positions, enabling fine-tuned control of variables like pressure, level, and temperature. This article examines the electrical connection details of Burkert's 8605 and 8611 proportional solenoid valve controllers and how to select between them for optimal fluid control in various applications.
Table of contents
- Burkert 8605 PWM controller overview
- Connecting the Burkert 8605 PWM controller to a proportional solenoid valve
- Burkert universal controller 8611 overview
- Connecting Burkert 8611 controller to a proportional solenoid valve
- How to select a proportional solenoid valve controller
View our online selection of controllers for proportional solenoid valves!
Burkert 8605 PWM controller overview
Figure 2: Burkert 8605 controller with an operating unit
The Burkert type 8605 controller is designed to control all Burkert proportional valves with a maximum current range from 40 to 2000 mA. It converts an external standard signal into a pulse-width modulated (PWM) voltage signal, which is then supplied to the solenoid coil of the proportional valve. This PWM signal regulates the average coil current, thereby determining the proportional opening of the valve. Read our Burkert 8605 solenoid valve controller article for more details on the design options and software features of 8605 controller.
The Burkert 8605 proportional solenoid valve controller is available with or without an operating unit.
- Controllers with an operating unit (Figure 2) feature an LCD and keys for direct configuration, displaying information, allowing settings adjustments, and providing real-time feedback. Users can navigate menus to set parameters like input signal type, valve settings, ramp functions, and zero point cut-off, with some models supporting parameter upload/download.
- Controllers without an operating unit (Figure 1) rely on pre-configured settings or external interfaces for configuration, with two LEDs indicating operating status: green for operation and yellow for current through the valve.
The Burkert 8605 is compatible with several Burkert valve series, like 2863, 2873, 2865, 2875, 6024, and 6223.
Connecting the Burkert 8605 PWM controller to a proportional solenoid valve
Safety precautions and identifying the controller version
Before starting the installation, ensure to follow these safety precautions:
- Turn off the power supply: Ensure the power supply is switched off and secured to prevent accidental reactivation.
- Depressurize the system: If the system is under pressure, depressurize it to avoid any risk of injury.
Next, identify the controller version.
- Cable plug version: This version connects directly to the proportional solenoid valve and has a 4-pin terminal strip inside the device.
- DIN rail version: This version is mounted on a DIN rail and connects to the valve via terminal strips.
Cable plug version electrical connections
Figure 3: 8605 controller showing the terminal strip and other internal components (cable plug version)
Figure 3: Terminal strip connection in 8605 controller (cable version): standard signal positive (A), power supply (B), standard signal negative (C), and ground (D).
- Unscrew the cover: Use a screwdriver to remove the cover of the cable plug version to access the 4-pin terminal strip inside the device.
-
Identify the terminals: Inside the controller, there is a 4-pin terminal strip. The terminals are typically labeled as follows:
- A: Positive input signal
- B: Power supply (12-24V)
- C: Negative input signal
- D: Ground
- Connect the wires: Strip the insulation off the ends of the wires to expose about 5-7 mm of the conductor. Connect the signal wires, power supply, and ground to the appropriate terminals as discussed in step 2.
- Secure the connections: Tighten the screws on the terminal strip to ensure the wires are securely connected. Make sure there are no loose strands that could cause a short circuit. Ensure the cable is properly seated in the cable gland or plug connector M12. Tighten the gland or connector to secure the cable.
- Mount the controller on the valve: Place the controller on the valve's DIN connector, ensuring that the connector pattern matches. Use a screwdriver to tighten the screw M3. Do not overtighten; the recommended torque is a maximum of 0.3 Nm.
Figure 4: The 8605 controller plugs into the solenoid valve using a DIN connector.
Figure 5: Installation of the cable plug version of 8605 controller
DIN rail version electrical connections
The controller connects to the valve by screw terminals and is then DIN rail mounted. The solenoid valve connections are screwed onto the appropriate positions in the terminal strip, unlike the cable plug version. The DIN rail provides a standardized and organized way to mount the controller and other electrical components. Make the following connections for the DIN version of Burkert 8605 controller:
- A: Power supply
- B: Ground
- C: Input signal (-)
- D: Input signal (+)
- E: Proportional solenoid valve connection
- F: Proportional solenoid valve connection
- G: RS485-B7T x D
- H: RS485-A/R x D
- I: Ground
Figure 6: Terminal strip connection in 8605 controller (DIN rail version)
For controllers with an operating unit, use the operating unit to enter configuration mode and adjust settings such as input signal type, solenoid valve type, valve parameters, PWM frequency, ramp function, zero point cut-off, controller parameters, interface address, and safety position.
Burkert universal controller 8611 overview
Figure 7: Burkert 8611 universal controller
The Burkert 8611 universal controller operates on a 24V DC power supply and uses proportional and integral (PI) control to adjust parameters like flow rate, pressure, or temperature by controlling proportional valves. Additionally, it can provide a 24 V DC power supply output for sensors and actuators.
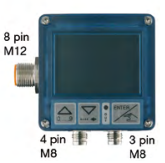
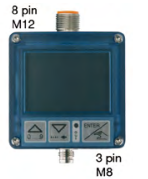
Table 1: Burkert 8611 universal controller connection feasibility and controller versions
| Assembly | Flow sensor fitting mounting |
Wall and rail mounting | Valve mounting | |
| Integrated HALL-sensor, without external sensor input | Integrated HALL-sensor, with external sensor input | Without HALL-sensor, with external sensor input | Without HALL-sensor, with external sensor input | |
| Control | Flow control | Temperature control with flow display, temperature control with flow input for cascade control, ratio control | Temperature control, pressure control, flow control | Temperature control, pressure control, flow control |
 |
 |
 |
 |
|
Connecting Burkert 8611 controller to a proportional solenoid valve
The Burkert 8611 proportional solenoid valve controller offers various mounting options, including wall, rail, fitting, proportional valve, and panel mounting. Selecting the appropriate mounting option depends on your specific application requirements and the available space for installation. For instance, wall and rail mounting are ideal for versatile installations where the controller needs to be easily accessible, while fitting mounting is suitable for direct integration with flow sensor fittings. Proportional valve mounting is convenient for direct attachment to the valve, and panel mounting is best for centralized control systems within control cabinets.
For applications requiring direct connection to a proportional solenoid valve, the Burkert 8611 can be directly connected using a DIN-A plug connection. This model includes a female plug at the rear of the process controller, allowing for seamless integration. By utilizing the DIN-A mounting point, the transistor output to control the valve is already connected, eliminating the need for extra wires or connections.
To connect the Burkert 8611 controller to a proportional solenoid valve using the proportional valve fitting method, follow these steps:
- Mounting: Secure the controller directly to the proportional solenoid valve using the DIN-A plug connection.
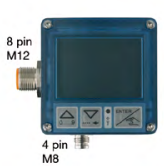
- Power supply: Connect a 24V DC power supply to the controller via the 8-pin M12 connector. This connector also handles other inputs and outputs.
- Set-point input: The set-point input (0-10 V or 4-20 mA) is also wired to the 8-pin M12 connector. This input will provide the desired control signal to the controller.
- Sensor inputs: Connect the necessary sensor inputs (e.g., flow rate, pressure) to the 3-pin M8 connector. Each model of the 8611 controller can accept one specific sensor type, so ensure to select the appropriate model based on your sensor requirements.
- Configuration: Refer to the Burkert 8611 user manual to configure the controller settings, including the PWM frequency and control parameters, to match the specific requirements of your proportional solenoid valve and application. The PWM frequency for Burkert valves is pre-memorized in the controller, simplifying the setup process.
Figure 7: Burkert 8611 controller installation example showing the mounting on a proportional valve (showed dotted in the image)
Read our Burkert 8611 controller article for more information on the working, control functions, and various mounting and installation variants of this controller.
How to select a proportional solenoid valve controller
When choosing a controller for proportional solenoid valves, consider the following key factors to ensure optimal performance and compatibility with your application.
Control type: Open loop vs closed loop
- Open loop control (Type 8605): Best for stable systems with minimal disturbances. Suitable for applications where minor deviations are acceptable, such as simple, stable flow control.
- Closed loop control (Type 8611): Designed for dynamic systems with frequent disturbances. Provides continuous feedback for precise control, making it suitable for complex processes like temperature and pressure control.
Control inputs
- Set-point signal compatibility: Type 8605 accepts 0-5 V, 0-10 V, 0-20 mA, and 4-20 mA signals. Type 8611 accepts these standard signals plus frequency and Pt100 sensors.
- Sensor requirements (Type 8611): Sensors must match the controller’s input specifications (e.g., 4-20 mA, 0-10 V) and provide accurate real-time feedback.
Control inputs and outputs
- Output compatibility: Type 8605 controls Burkert proportional valves with PWM signals. Type 8611 controls various valves with PWM, PTM, and standard signals (4-20 mA, 0-10 V).
- Valve input compatibility: Ensure the control signal from the controller matches the valve’s input requirements.
Mounting style
- Type 8605: The cable plug version mounts directly on the valve, making it compact. The DIN rail version is suitable for centralized control cabinets.
- Type 8611: Offers multiple mounting options including fitting-mounting for integrated flow control with sensor fittings, wall-mounting for wall or panel installations, standard rail-mounting for control cabinets, and valve-mounting directly on proportional valves.
Additional considerations
- Environmental conditions: Ensure the controller’s operating temperature range and IP rating suit the installation environment (e.g., Type 8605: -10 to 60ºC, IP65).
- Power supply: Verify that the controller’s power supply requirements match the available power source, typically 24 V DC.
- System integration: Consider the ease of integration with existing systems and the availability of communication interfaces such as RS232 or RS485 for remote monitoring and control.


