


RV Check Valve Replacement
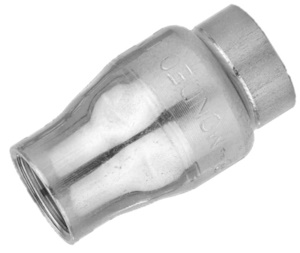
Figure 1: Check valve for an RV
RV check valves prevent backflow, which can cause contamination and system malfunctions. The check valves are typically connected at the water pump outlet and the city water inlet. This article examines the role of check valves in RVs, identifies signs of a faulty valve, and provides guidance on RV water pump check valve replacement.
Table of contents
- How does an RV check valve work
- Signs of a faulty check valve
- How to repair an RV check valve
- Replacing an RV check valve
- Conducting annual inspection
View our online selection of check valves!
How does an RV check valve work
Check valves are normally located at two positions in an RV plumbing system (Figure 2 labeled C):
- Pump check valve: This check valve is typically located on the outlet side of the water pump (Figure 2 labeled B). The pump is on the output of the freshwater tank and pumps water to the rest of the RV. So the check valve on the pump outlet ensures it doesn't go back to the freshwater tank when it's possibly contaminated and/or it keeps the lines primed.
- City water inlet: When the RV is connected to a city water supply (Figure 2 labeled D), this check valve prevents the city water from flowing back into the RV's freshwater tank. It ensures that water from the city supply is directed directly to the faucets and other fixtures, without contaminating the stored water in the tank.
The pump draws fresh water from the tank into the system when the user turns on a faucet. The check valve keeps the water from flowing back into the tank. When connected to a city water supply, the higher city water pressure (typically 40-60 PSI) automatically keeps the pump off, allowing the water to bypass the tank and pump, and flow directly into your plumbing system.
Spring-loaded check valves are commonly used in an RV plumbing system. They are relatively silent, minimize water hammer, and can be installed horizontally or vertically.
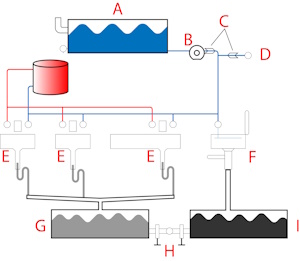
Figure 2: RV plumbing system: fresh water tank (A), water pump (B), pump and city water inlet check valves (C), city water inlet (D), sink/shower (E), toilet (F), grey water tank (G), dump valves (H), and black water tank (I).
Signs of a faulty check valve
A check valve can get stuck for various reasons, such as debris, corrosion, or a malfunctioning spring. Here are some common symptoms that might indicate a problem with the check valve:
- Leaking water: Indicates the valve isn't closing properly
- Decreased water pressure: May result from a damaged valve
- Pump runs continuously: Suggests the valve isn't holding pressure, causing the pump to overwork
- Unusual noises: Thunking or clicking sounds can indicate valve failure
- Backflow of water: A sign of a malfunctioning valve
- Water contamination: Changes in water quality may be due to a faulty valve
- Rapid cycling of the pump: Known as 'short cycling,' this can reduce pump lifespan
How to repair an RV check valve
Though replacing the check valve is the best solution, there are a few temporary fixes to try when immediate replacement isn't possible. First, check the RV water pump’s manual to see if there is an internal check valve and if it is serviceable. Some pumps allow for the check valve to be accessed and serviced, while others may not.
- Use a plug: Temporarily plug the inlet of the RV city water check valve to prevent backflow. This will give you some time to address the root cause of the leak.
-
Inspect valve parts: Carefully examine the valve components:
- Valve body: Check for visible cracks or damage.
- Disc: Ensure it moves freely without obstructions.
- Spring: Verify it is intact and properly compressed. Gently depress the spring with a flathead screwdriver, releasing any debris.
- Seat: Inspect for wear or damage and clean any debris or mineral deposits.
- O-ring: Check if the o-ring has slipped out of its groove. The o-ring is crucial for sealing the valve.
After inspection and cleaning, reassemble the valve. Carefully place the o-ring back into its groove, reinsert the spring, and secure the components. This requires some balancing and pressure to lock everything in place. Replace the valve if it is cracked, heavily corroded, or damaged.
Replacing an RV check valve
Check the RV’s manual for specifications on the check valve, such as size, type, and material requirements.
- Ensure the check valve connection size matches the pipe system and identify the connection type to ensure compatibility.
- RV check valves typically use threaded (NPT, BSP), compression fittings, or push-fit connections.
- Ensure the check valve's pressure rating meets or exceeds the RV's system requirements. A pressure regulator at the city water inlet reduces incoming pressure to 2.76-3.45 bar (40-50 psi), matching the RV's freshwater pump output.
- Since both systems operate within this range, a check valve rated for at least 5.5 bar (80 psi) is suitable for both connections.
How to replace a threaded check valve in an RV pump
- Turn off the water supply to the RV and relieve pressure by opening a faucet.
- Locate the pump. It is typically found under the kitchen sink or in a similar compartment. Clear any obstructions to gain access to the pump and its fittings. If space is limited, consider moving the pump a few inches to accommodate the new valve.
- Apply Teflon tape to the threads of the check valve.
- Identify the pressure side of the pump where the water exits. Typically, the water flows from the pump through a hose and into the plumbing system.
- Disconnect the hose from the pump's outlet. Align the check valve in line with the hose, ensuring the arrow on the valve points toward water flow (away from the pump).
- Hand-tighten the valve. Use a wrench to tighten it further; do not overtighten to avoid damaging the threads.
- Reattach the hose, making sure all connections are secure.
Reconnecting and testing
- Secure all connections and turn the water supply back on.
- Test the system by running the pump and checking for leaks or pressure issues.
- Connect to city water to ensure the check valve prevents backflow.
The basic process of replacing a city water and pump check valve in an RV is the same. Read our check valve installation article for guidelines on replacing other check valve connection types, such as compression or push-fit connections.
Conducting annual inspection
Conduct an annual inspection of your RV's water pump and check valve with these steps:
-
Clean the filter: Ensure the filter on the pump's inlet side is clean to prevent clogs. If your pump lacks a filter, consider installing one.
- It's advisable to place a strainer between the freshwater tank and the pump. This strainer helps catch larger debris before it reaches the pump and its filter,
- Clear debris: Regularly clean the check valve to remove any scale, algae, or debris that could cause damage.
- Sanitize the system: Disinfect the entire freshwater system by sanitizing and desalinating it.
- Inspect water lines: Visually check for any leaks or damage in the water lines and repair as needed.

