How To Replace a Water Pressure Regulator

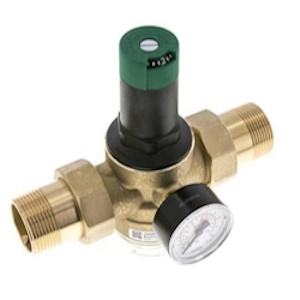
Figure 1: Water pressure regulator with a built-in strainer and pressure gauge
Replacing a failing water pressure regulator is critical for maintaining safe and consistent water flow and pressure throughout a building's plumbing system. Fluctuating water pressure caused by a faulty regulator can lead to leaks, bursting pipes, damage to appliances, and higher utility bills over time. This article provides a comprehensive guide on detecting a failing water pressure regulator, replacing it efficiently, and installing a new one.
Table of contents
- What is a water pressure regulator
- Detecting a faulty water pressure regulator
- Replacing a water pressure regulator
- How to install a water pressure regulator
- FAQs
View our online selection of pressure regulators!
What is a water pressure regulator
A water pressure regulator, also referred to as a pressure reducing valve (PRV), is an essential device installed along the main water supply line entering a building. The regulator controls the incoming main line water pressure to a stable and suitable range of pressure for the building's internal plumbing network. It adjusts the high main line pressure that fluctuates, depending on municipal water demand and supply, to a lower and more consistent pressure level. This protects the infrastructure of pipes, joints, faucets, and water-based appliances from damage over time due to exposure to excessively high water pressure. The regulator's stable, reduced pressure level output ensures optimal flow rates and functionality throughout the system. They are widely used in residential, commercial, and industrial applications. Read more about home water pressure regulators and RV water pressure regulators.
Detecting a faulty water pressure regulator
An automatic water leak detection system provides continuous monitoring of water flow and pressure to promptly identify and alert homeowners to potential leaks. These devices send alerts to the phone in case of a leak and can shut off the main water supply to prevent damage. In other cases, detecting a faulty water pressure regulator involves looking for signs that it is malfunctioning. Here are steps and signs to help determine if the water pressure regulator is faulty:
- Unusual water pressure changes: Sudden changes in water pressure, either too high or too low, can indicate that the regulator is not functioning correctly.
- Noisy pipes: Fluctuations in water pressure caused by a faulty regulator may result in water hammer, characterized by banging or noisy pipes.
- Leaking or dripping faucets: Persistent leaks or drips from faucets or toilets may indicate that the pressure is too high due to a malfunctioning regulator.
- Use a water pressure gauge: Some water pressure regulator models have an integrated pressure gauge that reads the water pressure at the regulator output (Figure 1). Normal residential water pressure should be between 2.7 and 4.1 bar (40 - 60 psi). Readings outside this range can suggest a problem with the regulator. If there is no integrated pressure gauge, attach an external gauge to a connection (such as a washing machine), where one can screw the gauge directly onto the threads meant for a hose.
- Inspect the regulator: Check for visible signs of wear, corrosion, or damage on the regulator. Physical deterioration can impair its function.
- Check water pressure after shutting off fixtures: Turn off all water fixtures in the house and watch the pressure gauge. If the pressure builds up after all fixtures are off, the regulator may fail to maintain the set pressure.
- Appliance and fixture damage: Unexplained issues or premature failure of water-using appliances and plumbing fixtures could result from incorrect pressure regulation.
- Adjustment test: Try adjusting the regulator to a different pressure setting and observe if the pressure changes accordingly when measured with the gauge. The inability to adjust the pressure or a lack of corresponding change in the water pressure could indicate a faulty regulator.
- Flow test: Monitor the water flow after the regulator. A significant decrease in flow could mean the regulator is stuck in a partially closed position, while an excessive flow rate could indicate it's stuck open.
If one suspects the water pressure regulator to be faulty based on these signs and tests, it may be necessary to replace it.
Replacing a water pressure regulator

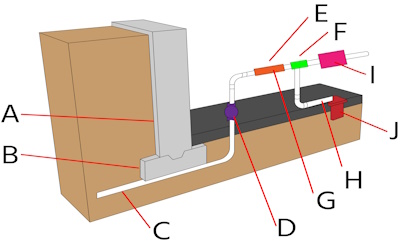
Figure 2: Water pressure regulator installation setup: foundation wall (A), footing (B), supply plumbing from street (C), main water shutoff valve (D), pressure regulator (E), pressure relief valve (F), pressure relief discharge pipe (G), filter (H), water meter (I) and floor drain (J)
The water pressure regulator is typically located after the mains valve, and is secured with threaded couplings. A standard installation setup consists of the main shutoff valve, check valve, filtering unit and the water pressure regulator in order. Here's how to replace a water pressure regulator:
- Turn off the water supply by closing the main shutoff valve. This valve must be before the water pressure regulator to ensure no water flows through the system during replacement (see Figure 2).
- Open the nearest faucet to the regulator to drain any remaining water from the pipes. This faucet should be at the lowest point at home to ensure maximum drainage.
- Place a bucket and towel beneath the current regulator.
- Use Channellock pliers to loosen the couplings and remove the existing regulator.
- Position the new regulator and tighten the couplings manually.
- Use the pliers to ensure the couplings are securely tightened.
- Restore the water flow at the mains valve and inspect for leaks.
- Close the initially opened faucet after purging any air from the system.
How to install a water pressure regulator

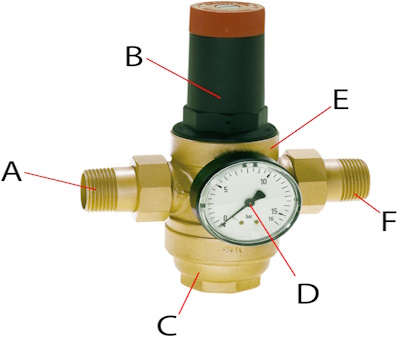
Figure 3: Water pressure regulator parts: threaded male connection at the inlet (A), adjustment knob (B), filter bowl (C), pressure gauge (D), housing (E), and threaded male connection at the outlet (F)
The main steps in the installation process are outlined below:
- Turn off the main shutoff valve. Measure the length of the regulator with couplings and mark it on the pipe after the component to which the regulator connects to (typically the main shutoff valve, check valve, or filter).
- Use a pipe cutter to cut the pipe at the marked spot, ensuring not to remove excess pipe.
- Clean the pipe and fittings with grit cloth and a wire brush, then apply flux paste for soldering.
- A water pressure regulator has two threaded connections - one at the inlet where the water at high pressure enters the regulator and the other at the outlet, which lets the regulated water out into the various fixtures. Slide the couplings on the pipe and insert the regulator's threaded connection at the inlet end (Figure 3 labeled A). Connect the second threaded connection end (Figure 3 labeled F) to the pipe connecting to various fixtures.
- Turn on the main valve, check for leaks, and let trapped air out by closing the opened faucet.
- Test the pressure post-installation and adjust the regulator if needed by using the adjustment knob (Figure 3 labeled B) and turning it to reach the desired pressure level, as confirmed by a gauge (Figure 3 labeled D).
- Inspect and set the pressure to the preferred levels, then reactivate the water supply from the main valve. This adjustment is made by rotating the screw found atop the pressure reducing valve.

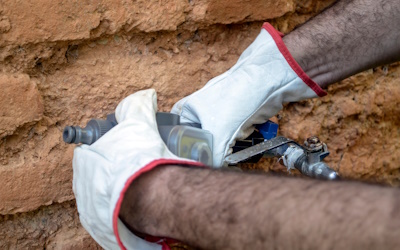
Figure 4: Installing a water pressure regulator on a tap
FAQs
How often should an old water pressure regulator be replaced?
Replace every 10-15 years or if there are signs of malfunction, such as water pressure changes.
What tools are needed for water pressure regulator installation?
Wrenches, pipe cutter, soldering equipment, Teflon tape, and a new pressure regulator.
What is the cost to replace a water pressure regulator?
Replacement costs vary, typically between 150 - 350$, including parts and labor.


